When I want to make my makeup last all day, here’s my process for giving my face all the help it can get. These are the heavy duty products that I apply in a particular order to get the best wear time and finish possible.
Prep
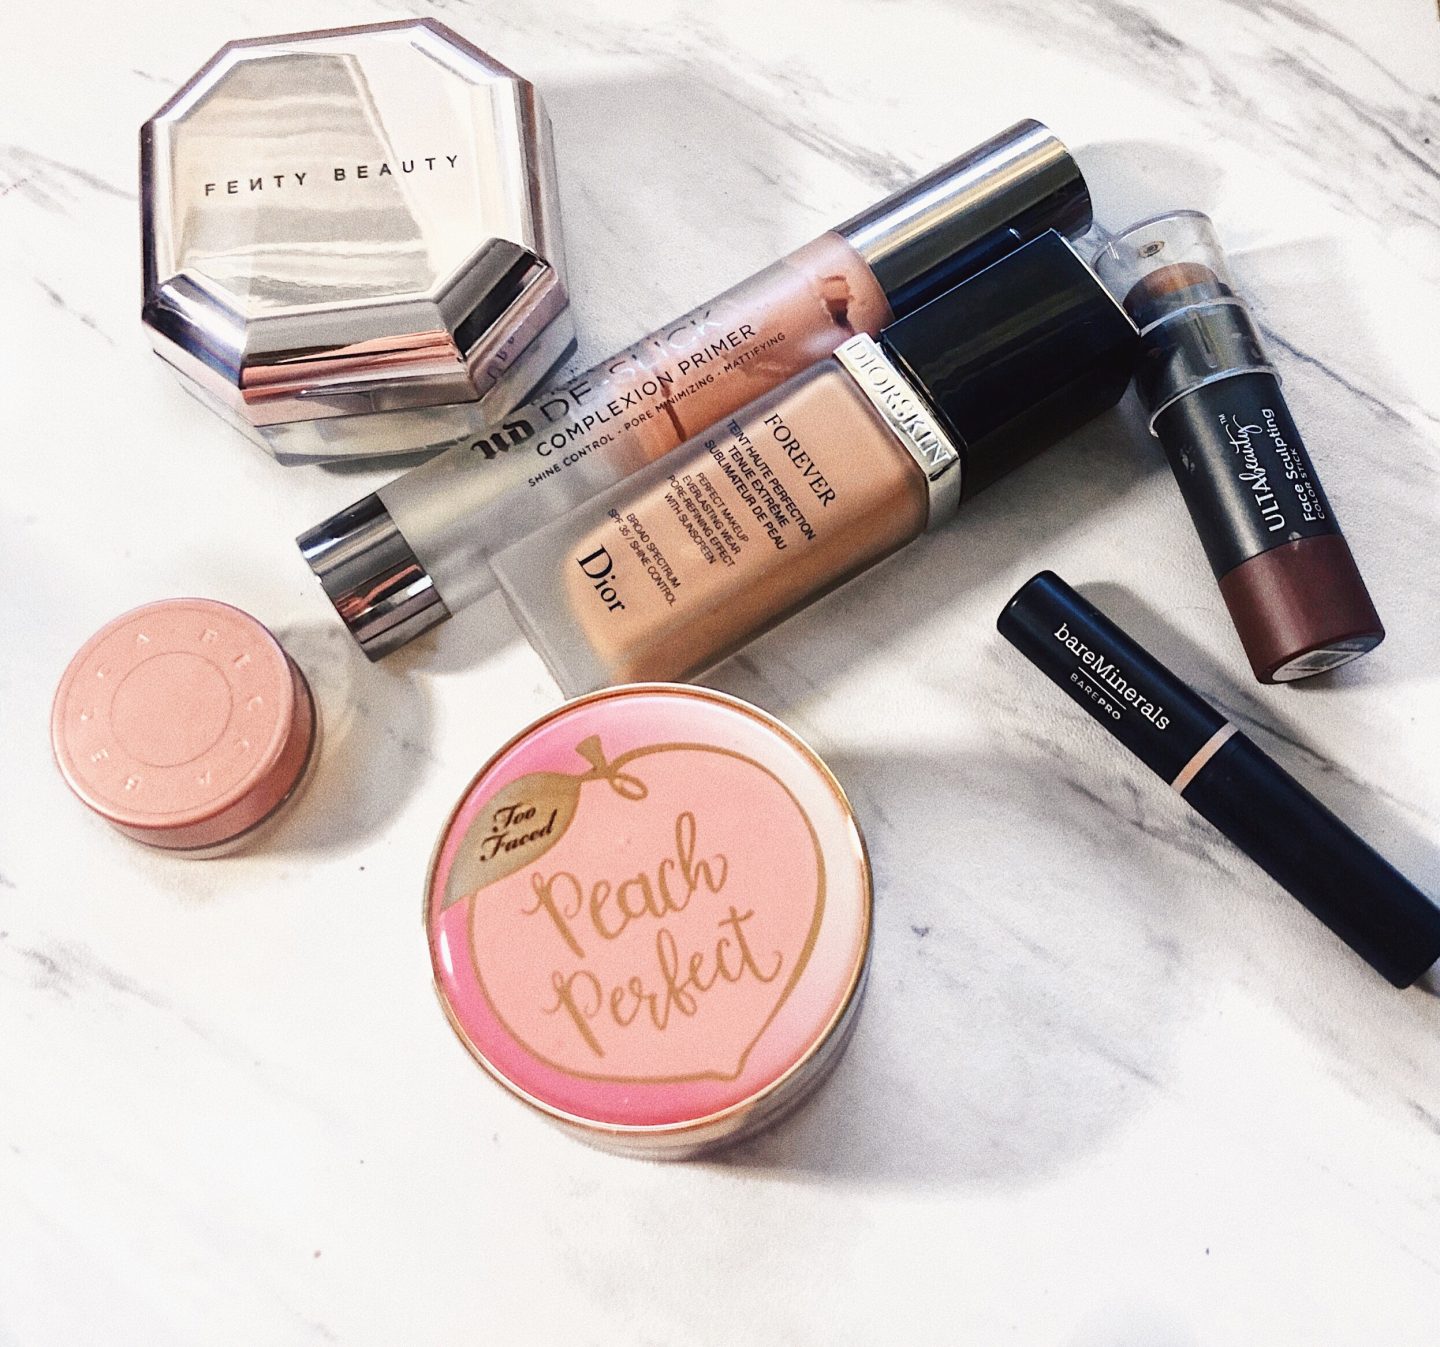
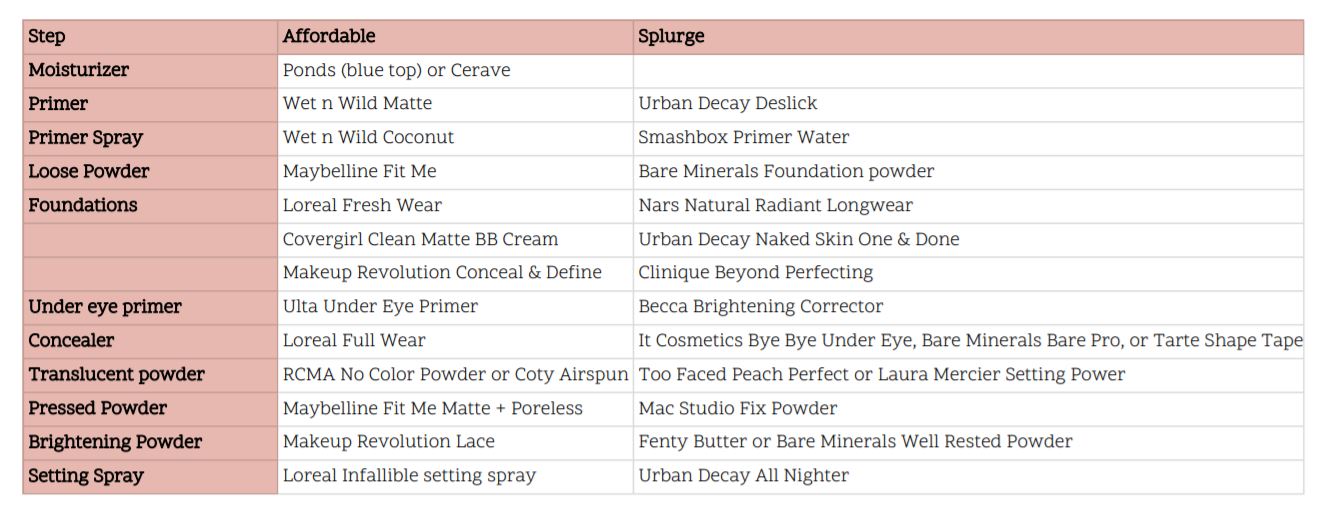
After cleansing my skin, I apply sunscreen & moisturizer. I like Ponds and let it soak into my skin while I apply my eye makeup. For sunscreen I’m really liking the Cerave AM SPF moisturizer (the Target generic version though!)
Primer
After I’ve applied eyeshadow I apply primer. For my oily skin I like one that is sticky for gripping my foundation & has mattifying properties to help with longevity. Urban Decay Deslick or Wet n’ Wild matte primer are my favorite for making my makeup last. If you have normal, less oily skin, you may like Smashbox photo finish primer, Mac Yellow Radiance, or Milk Hydrogrip. Those ones are awesome, but don’t hold up ALL day with my oils. I finish this step with a spray of Smashbox primer water or Wet n’ Wild Coconut primer water.
Set Primer
Apply a light layer of powder over the primer. This sets your primer and is an extra layer of backup for your base makeup to hold onto. I dust either Maybelline Fit Me loose powder, Coty Airspun, or RCMA No Color powder on with a Morphe stippling brush.
Foundation
Loreal Fresh Wear, Mac Face & Body, Clinique Beyond Perfecting, & Nars Natural Radiant are my front runners for a beautiful long lasting foundation. For everyday wear, I really like the Urban Decay Naked Skin One-And-Done or Covergirl Clean Matte BB cream too. They almost feel like a skincare product rather than makeup but have great coverage. I have three different methods I use for a long lasting application:
- The less you put on, the more nicely it will fade throughout the day. Same thought process applies to using BB creams. Lots that are out right now have a gorgeous finish and tons of coverage. If you’re used to getting full coverage with just your foundation, try just doing enough to even your skin tone. I recommend the Tarte Airbrush finish brush to apply and blend. It really buffs in the product. Just keep blending, even when you feel like you’ve done enough. You’ll get more coverage with concealer and powder in the next couple steps.
- However, if you’re really a foundation fiend, I get it. Work in thin layers if you want to build up coverage. Apply one layer, then let it sit for a second. Spritz on some primer water, and lightly bounce over the skin with a slightly damp beauty sponge. Then add another layer of foundation with your Tarte brush.
- Use your hands! This might remind you of being a makeup newbie, but I swear the heat in your hands does something magical to foundation. Dot on foundation, and blend out with your fingers. You’ll find that it melts into skin, so you might want to build up a second layer if you feel like you need more coverage. Mac Face & Body is especially beautiful with this technique and makes me feel like I have model skin.
Concealer
I start the under eyes with a little bit of Becca Under Eye Corrector. It creates a tacky base with a little pink color correction. Applying a tiny bit with my finger seems to warm up the product and help it melt into my skin. Next up for concealer I’ve been loving the Loreal Full Wear, Bare Minerals Bare Pro, or It Cosmetics Bye Bye Under Eye. Do just a dot under each eye, focusing toward the nose to make that area extra bright. I swear by the small ELF stippling brush. When I’m doing wedding makeup I use Tarte Shape Tape concealer. It’s amazing for special events but overkill for everyday in my opinion.
An extra step: Now that concealer is on, spritz on some primer water. You can either just let it dry, or lightly bounce over the skin with a slightly damp beauty sponge to blend the concealer & foundation together extra flawlessly. SLIGHTLY damp sponge is key here. Sometimes when it’s too wet it will lift away the makeup.
Set & Bake
I love to use a shade of powder that matches my foundation to set it. Bare Minerals Matte foundation powder is beautiful and gives that extra coverage, or I also like the Maybelline Fit Me Loose Powder. If you want that Mac girl super matte look, use a pressed powder instead. I use the Morphe stippling brush for this step.
I also bake my under eyes with a loose powder like fair light Maybelline Fit Me Loose Powder, Makeup Revolution Lace, or Coty Airspun. I leave the bake on while I do my bronzer and blush. After that I brush it away and apply a brightening powder there. I usually use a brightening shade from a contour palette (Tarte Chisel palette, Mac Emphasize or Accentuate, Kat Von D Lyric) or a light shade of loose powder (Fenty Butter, Bare Minerals Well Rested or Bisque, Makeup Revolution Lace). Read more about my favorite loose powders here.
Lock it in
Bronzer, blush, eyeshadow, mascara, brows, lip, and all that are done. I play it safe and always brush one light layer of translucent powder over everything to help my skin stay matte. RCMA no color powder, Coty Airspun, or Too Faced Peach Perfect Powder are translucent so they won’t wash me out. I don’t want to cover all the bronzing I’ve done! Then I use setting spray- Loreal Infallible is my favorite for everyday. If you want to splurge, I love Urban Decay All Nighter or Makeup Forever Mist + Fix. After I spray it, I use my damp sponge to go over everything, lightly pushing it into my skin.
TLDR
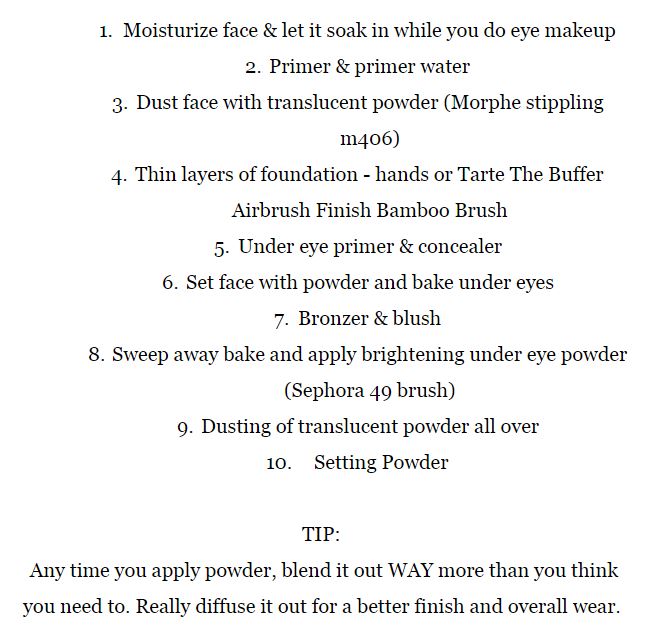
- Moisturize face, let it soak in while you do your eye makeup
- Prime with matte primer, spray primer water
- Set primer with powder
- Thin layers of foundation with hands or Tarte brush. Recommendations: Mac Face & Body, Clinique Beyond Perfecting, Nars Natural Radiant Longwear, Loreal Fresh Wear, Urban Decay Naked Skin One-And-Done, or Covergirl Clean Matte BB cream
- Prime concealer with Becca Under Eye Brightening Corrector with finger, apply Loreal Full Wear with ELF small stipple brush
- Set face with powder & bake under eyes.
- Bronze, blush, highlight, brighten under eyes with powder
- Translucent powder lightly all over
- Setting spray
Thank you for reading! I hope you picked up some new tips from this. If you have any questions let me know.
-Kim